Monday, September 30, 2013

Best blogger templates sites of all time that are completely free


          I am writing this tutoriall to help you guyz find the best blogger templates for your site I have these sites that gives the best looking blogger templates completely free with only a credit on your footer links 

1.Soratemplates 

2.Bt templates

3.Deluxe templates 

4.Blogger themes

Thanks for visiting this are the most high quality free blogger templates site dont forget to leave your comment

How to install custo fonts in android


Its easy i found out this nice trick


Step 1: Find your desired font. You will need certain types.
Get Sans Serif fonts here and Serif fonts here. Make sure they are .ttf.
  • Regular Serif
  • Bold Serif
  • Italic Serif
  • Bold Italic Serif
  • Regular Sans Serif
  • Bold Sans Serif
  • Italic Sans Serif
Step 2: Backup stock fonts.
Do so by following these steps.

  • Download DroidExplorer
  • Boot into Recovery Mode
  • Mount /system
  • Browse to /system/fonts
  • Copy all the fonts inside the folder onto your SD card or desktop
Step 3: Preparing new fonts
You will have to rename each font to your droid defaults.

  • Your regular serif font → DroidSerif-Regular
  • Your bold serif font → DroidSerif-Bold
  • Your italic serif font → DroidSerif-Italic
  • Your bold italic serif font → DroidSerif-BoldItalic
  • Your regular sans serif font → DroidSans
  • Your bold sans serif font → DroidSans-Bold
  • Your italic sans serif font → DroidSans-Italic

Now delete all the files from the /system/fonts.

If you have more fonts than listed here, do not delete them. For instance, on my phone, I have Arial fonts, which my phone uses by default for many things. If your phone also does this, simply rename your files accordingly.


Step 4: Replacing fonts
Make sure that you are still in recovery and your /system is mounted. Then follow these steps.


  • In DroidExplorer, drag all of your renamed files into the /fonts folder
  • Reboot your device
Hope this worked comment and thansk for visiting

How to get rid of ads


           Im writing this post  on how to get rid of in your browser because i also got the same problem sometimes you may not be able even to acces something in youyr browser just because of ads

Explanation
Ads are of many type there ads associated with websites and ads which are not associated with websites

Problem 
The problem is that  some ads may contain trojans and viruses but all in all they reduce complexibility while browsing

Solution
The best solution is using an adkiller extension if you are using mozilla and an adblocker software for other browser if your not using mozilla

Links
Ad killer for mozilla - https://addons.mozilla.org/En-us/firefox/addon/ad-killer/

Ad blocker for other browser - https://adblockplus.org 

Thanks for visiting Hope it works out comment if having any problems or appreciations
 

Getting problem not loading any social sites


      I have got many complains thats many computer are having problem visiting and browsing any social sites like facebook,twitter etc but im not yet sure wat  is the problem but i have a solution that worked to one of my visitors .

Explanation
The solution is that  many social sites php's use your computer browsers certificate to establish a secure connection.

Problem
 The problem is that your certificate may be invallid so the browser cant establish the connection and you get error messages like connection timed out and may be untrusted connection

Solution
 The solution is either upgrading your browser or updating your computer time

Why 
Because the browser may be having out dated certificates or your computer time may not be going right with the certificates time

Thanks for visiting comment if having any problems

Friday, September 27, 2013

How to make your own font

 
              Lastly i made a tutorial on how to uninstall avast completely today i am basicly going just to give you a light on how to make your own fonts 

You will need a photo editing program and a font making program 
For photo editing i suggest a free photoshop that i offered in my download page and 
For a font making program i suggest Fontforge its free download here 


For further more steps on making im going to give you a site that you will get the full tutorial


Here 

I also suggest uploading your font here  so that others can use it if its not private thanks for visiting for questions leave a comment and il be sure to answer

How to completely uninstall avast

 Its a fact that avast is one of the most resisting to uninstall so i am going to share with you this trick of easily uninstaling avast from your computer

Follow this steps
  •  
  • Download the Avast Uninstall Utility (aswclear.exe) from the Avast site: http://files.avast.com/files/eng/aswclear.exe 
  • Start Windows in Safe Mode.  
  •  Open aswclear.exe by navigating to that file in Windows Explorer and double clicking on the file name. 
  • Select the product to uninstall from the drop down list. 
  • Enter the path where the selected product is installed. Be careful as all files from this path will be deleted by the Uninstall Utility. 
  • Click "Uninstall".  
  • Restart your computer. 
  • By doing all this you will be sure to have  removed  avast from your computer if having problems with this comment il be sure to reply 

  • Thursday, September 26, 2013

    How to change after effects language


    Hey guyz today im goin to share with you this trick to change after effect from my last tutorial on how to Resume idm dowloads here i know will show you how to change your after effects language since some people download after effects but they find it installed in another language they dont prefer and since the interfece is in another language they can do nothin follow these steps to change your after effects language .

    Step 1
    Open the directory you installed after effects example C:\Program Files\Adobe\after effects thats my directory

    Step 2
    so after opening the after effects folder find a folder named Amt languages 

    Step 3 you will find a text file named on the default language ex  mine is espanial so its named Es_es so when you open it has also the same content Es_es Just change that to the language you want for me its english so i save it to En_us Or any other abbreviation of your language below is a list of languages and there abbreviation 
    French = FR_fr
    Italian= IT_it
    Japanese= JP_ jp 
    There are much more but thats all i know so you can google 
    Note : After changing th content language remember to save it with the same Word exampla english il save it as En_us.txt

    Thanks for visiting leave ur comment and questions
    f


    How to resume idm downloads manually (no software needed)


    Recently I made a post on how to crack idm manually here  but the problem sometimes peoples servrers just falls down and idm files cant resume downloading here is a little trick that i found out it works


    • 1 Open the same file in the browser, click to download it again, when dialogue window appear select to "download it later". (Check to ensure that the file must have the same file size and from the same link/server).
    • 2 Open IDM manager window and double click the file you have selected to "download later" 
    • 3 Select the full address field and press ctrl+c to copy to the clipboard.
    • 4 Now, double click the file which has not been resuming and paste the address there which you have copied earlier in the address field press ok. 
    • 5 In the IDM manager window click the file and press resume. 90% of the resuming problems has been resolved by this little tip and trick.
    Or you can just right click the file  in idm and click refresh web adress and then click on download link again then resume the download 
    Thanks for visiting comment if u have  any problem or request il  be sure to reply

    Wednesday, September 25, 2013

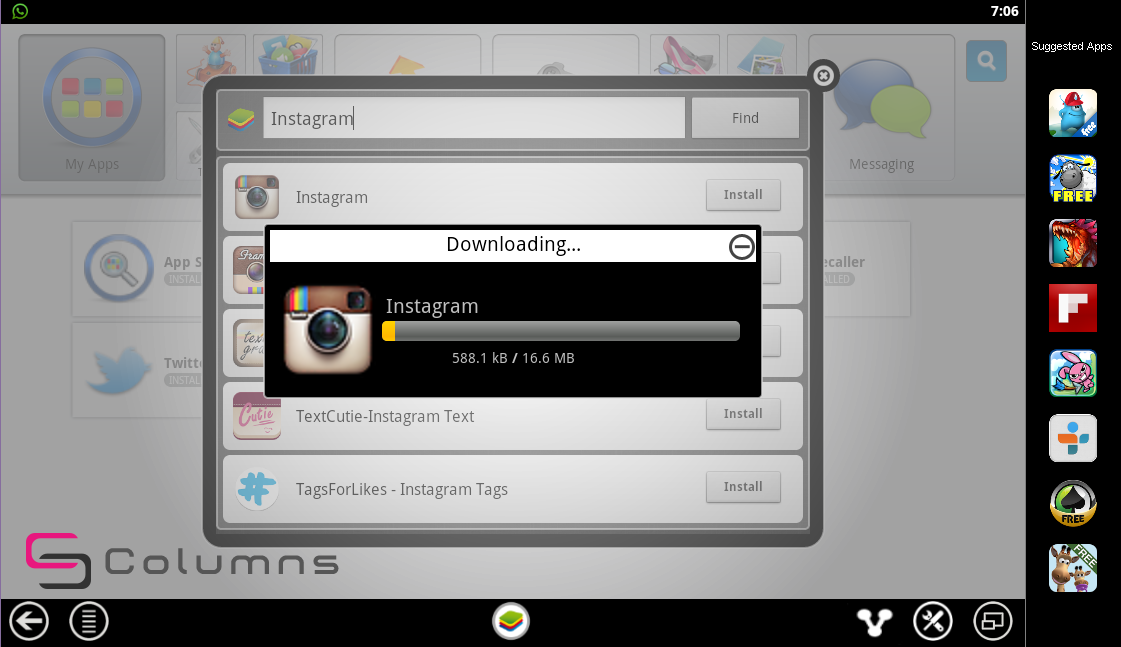
    How to sign up for Instagram Nd use it on A pc Free


    Today im going to share with u a trick that i use to use instagram on my pc i can sign up and log in using a pc its easy 

    Step 1
    Download and Install BlueStacks. It helps you to set up an environment for running the Instagram app on your computer.

    Step 2
     Download the Instagram Android app.

     Step 3
     Now install the Instagram app in Bluestacks by double clicking the .apk file. BlueStacks will automatically install the app.

    Step 4
     Start the Bluestacks app launcher and open the Instagram app from your BlueStacks’ library. 


    Thanks thats  all i had to share hope it works feel free to comment and ask for smthing new ilbe xure to post and answer u back


    How to make a working signup form

           Hello guyz im writing this post on making a working sign up form coz i havent seen enough over the internet coz i have searched enough when i waz workin on a project to do so hope this will work.

    Step 1
    The first thing were going to do is create a database were all our information will be stored
    (the information that  a user submits )

    1. Open phpmyadmin or any other online database manager
    2. Click create table and name it as simple_login.
    3. Then name the database as "simple_login".
    4. After creating a database name, click the SQL and paste the below code.


    Step 2
             <form name="reg" action="code_exec.php" onsubmit="return validateForm()" method="post">

        <table width="274" border="0" align="center" cellpadding="2" cellspacing="0">

        <tr>

        <td colspan="2">

        <div align="center">

        <?php

        $remarks=$_GET['remarks'];

        if ($remarks==null and $remarks=="")

        {

        echo 'Register Here';

        }

        if ($remarks=='success')

        {

        echo 'Registration Success';

        }

        ?>

        </div></td>

        </tr>

        <tr>

        <td width="95"><div align="right">First Name:</div></td>

        <td width="171"><input type="text" name="fname" /></td>

        </tr>

        <tr>

        <td><div align="right">Last Name:</div></td>

        <td><input type="text" name="lname" /></td>

        </tr>

        <tr>

        <td><div align="right">Gender:</div></td>

        <td><input type="text" name="mname" /></td>

        </tr>

        <tr>

        <td><div align="right">Address:</div></td>

        <td><input type="text" name="address" /></td>

        </tr>

        <tr>

        <td><div align="right">Contact No.:</div></td>

        <td><input type="text" name="contact" /></td>

        </tr>

        <tr>

        <td><div align="right">Picture:</div></td>

        <td><input type="text" name="pic" /></td>

        </tr>

        <tr>

        <td><div align="right">Username:</div></td>

        <td><input type="text" name="username" /></td>

        </tr>

        <tr>

        <td><div align="right">Password:</div></td>

        <td><input type="text" name="password" /></td>

        </tr>

        <tr>

        <td><div align="right"></div></td>

        <td><input name="submit" type="submit" value="Submit" /></td>

        </tr>

        </table>

        </form>

             CREATE TABLE IF NOT EXISTS `member` ( `mem_id` int(11) NOT NULL AUTO_INCREMENT, `username` varchar(30) NOT NULL, `password` varchar(30) NOT NULL, `fname` varchar(30) NOT NULL, `lname` varchar(30) NOT NULL, `address` varchar(100) NOT NULL, `contact` varchar(30) NOT NULL, `picture` varchar(100) NOT NULL, `gender` varchar(10) NOT NULL, PRIMARY KEY (`mem_id`) ) ENGINE=MyISAM DEFAULT CHARSET=latin1 AUTO_INCREMENT=3 ;
    ' Now we have to create a form that the user will submit his data to create a form and save it as index.php. To create a form, open your HTML code editor and paste the code below after the html tag.


     step 3

    Next step is to create a database connection and save it as "connection.php". This file is used to connect our form to database. This file serves as a bridge between our form and our database.

        <?php
        $mysql_hostname = "localhost";
        $mysql_user = "root";
        $mysql_password = "";
        $mysql_database = "registration";
        $prefix = "";
        $bd = mysql_connect($mysql_hostname, $mysql_user, $mysql_password) or die("Could not connect database");
        mysql_select_db($mysql_database, $bd) or die("Could not select database");
        ?>
       
       
        Note:Replace the hostname with ur host name like wise user , password and dataabase name in the connection php
       
        Step 4
       
        Next step is to create our script that save our input data to database and save it as code_exec.php.


        <?php
        session_start();
        include('connection.php');
        $fname=$_POST['fname'];
        $lname=$_POST['lname'];
        $mname=$_POST['mname'];
        $address=$_POST['address'];
        $contact=$_POST['contact'];
        $pic=$_POST['pic'];
        $username=$_POST['username'];
        $password=$_POST['password'];
        mysql_query("INSERT INTO member(fname, lname, gender, address, contact, picture, username, password)VALUES('$fname', '$lname', '$mname', '$address', '$contact', '$pic', '$username', '$password')");
        header("location: index.php?remarks=success");
        mysql_close($con);
        ?>
       
       
        Step 5
       
        To add some input validation using javascript, add the code below in the head tag of your index.php file. Input validation is used to make sure that all input field are filled out before saving the to database.


            <script type="text/javascript">
            function validateForm()
            {
            var a=document.forms["reg"]["fname"].value;
            var b=document.forms["reg"]["lname"].value;
            var c=document.forms["reg"]["mname"].value;
            var d=document.forms["reg"]["address"].value;
            var e=document.forms["reg"]["contact"].value;
            var f=document.forms["reg"]["pic"].value;
            var g=document.forms["reg"]["pic"].value;
            var h=document.forms["reg"]["pic"].value;
            if ((a==null || a=="") && (b==null || b=="") && (c==null || c=="") && (d==null || d=="") && (e==null || e=="") && (f==null || f==""))
            {
            alert("All Field must be filled out");
            return false;
            }
            if (a==null || a=="")
            {
            alert("First name must be filled out");
            return false;
            }
            if (b==null || b=="")
            {
            alert("Last name must be filled out");
            return false;
            }
            if (c==null || c=="")
            {
            alert("Gender name must be filled out");
            return false;
            }
            if (d==null || d=="")
            {
            alert("address must be filled out");
            return false;
            }
            if (e==null || e=="")
            {
            alert("contact must be filled out");
            return false;
            }
            if (f==null || f=="")
            {
            alert("picture must be filled out");
            return false;
            }
            if (g==null || g=="")
            {
            alert("username must be filled out");
            return false;
            }
            if (h==null || h=="")
            {
            alert("password must be filled out");
            return false;
            }
            }
            </script>


            Thats all we have to do you now just have to visit the index.php to ensure every thin is right
            Thanks for visit feel free to comment